Biggest Order Ever!
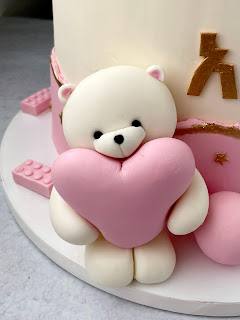
Call me crazy… but I took on a BIG order over the holidays. Our client shared with us a beautiful inspiration photo that she wanted to recreate, and we were in love!
 Typically cake pop dipping for me works ok, but this time I needed really smooth-looking cake pops. Turns out, this took some figuring out. I mean, I even have a Wilton melting pot, but I found that even the lowest setting was too hot for the Ghirardelli chips I was using. And of course, even the paramount crystals I had bought to help avoid this wasn't working (btw, have you had any luck with these? I have never had any luck with any chocolate smoothing methods).
I like to organize my thinking on a yellow pad paper. Here is a picture of how I lay out an entire order. This is my actual sheet so it is messy LOL! There are 3 main columns.
In this post I am going to share what worked, and what didn't work when it came to creating this order... plus scroll to the bottom to see our planning sheet for some notes on rates. The full order included:
- 1 custom cake
- 1 smash cake
- 3 dozen cupcakes
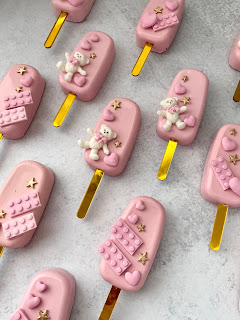
- 3 dozen cakescicles
- 3 dozen cake pops
- 3 dozen cake shooters
The theme was a beautiful mix of snow white teddies, gold stars, pink legos, and pink hearts. In the end, we created this beautiful dessert table below. So let's dive into to see what worked and what didn't (and how we fixed it)!
This cake has some dipped styrofoam balls as part of the topper. Although dipping chocolate has been a journey for me, I thought I had this figured out for the most part... I mean, it looks so easy on Instagram right??! So I melted Ghirardelli chips and dipped away. One worked perfect, but for some reason I could not replicate it with the rest of the balls for the life of me. The styroballs were looking SOOO horrible, I wish I had taken a pic to show you how bad, but just know, they were bad LOL.
The fix: I tried specific temperature settings, paramount crystals, you name it! After many tries and a few YouTube videos later, I decided to do an emergency trip to Walmart to get some almond bark. Rather than chocolate, almond bark is a candy coating which is super easy to melt and dip, plus it comes in bright white!
Since I've heard that chocolate tastes better than almond bark, I've never used almond bark, but since these were styrofoam balls, I should have thought about using it for the styrofoam in the first place!
#2: Achieving smoother cake pops took some trial and error
 Typically cake pop dipping for me works ok, but this time I needed really smooth-looking cake pops. Turns out, this took some figuring out. I mean, I even have a Wilton melting pot, but I found that even the lowest setting was too hot for the Ghirardelli chips I was using. And of course, even the paramount crystals I had bought to help avoid this wasn't working (btw, have you had any luck with these? I have never had any luck with any chocolate smoothing methods).
The fix: After many tries I figured out that my sweet spot for dipping room temperature cake pops (avoid chilling them to avoid cracks!) with Ghirardelli, is 96 - 98 degrees Fahrenheit. In order to make sure they were at this temperture I used the microwave and contantly measured the temperature with a temperature gun. As much as I tried to get many cake pops dipped when the chocolate was at this temperature range, I found I was only able to get 2-3 dips before the temperature cooled off too much.
#3: Cakescicle sticks were not staying put!
The gold popscicle sticks I bought were pretty thick, so when I pushed them into the mold, they didn't
like laying flat. Instead, the stick would fall into the pool of chocolate.
like laying flat. Instead, the stick would fall into the pool of chocolate.
The fix: I used a rubberband and small tray to finally get these to stay put!
What worked
#1: The fondant
After modeling, molding, and covering cakes with fondant, we've found that nothing beats the easy use, clean look, and yummy taste of homemade marshmallow fondant! We use our fondant recipe time and time again to achieve these fun fondant details for every order.
#2: The molds
We are obsessed over finding the easiest to use molds so it will make our work look good while helping us move faster! These are all of the molds that we used to achieve this design:
#3. The planning
I like to organize my thinking on a yellow pad paper. Here is a picture of how I lay out an entire order. This is my actual sheet so it is messy LOL! There are 3 main columns.
The one at the left represents the item to be made, the baking required for it, and any boards or packaging I will need. If you look closely I also added my pricing notes here as well.
.
The middle column has other decorating material and supplies I will need such as fillings and decorating finishes.
.
The right most columns includes the details of the molded or modeled decor such as the teddy toppers, styrofoam balls, legos, stars, hearts, etc.
.
As I work through the baking, I like to cross out what I have completed and that helps me feel like I am making progress!
And that is it for the behind the scenes look into this super fun order, I hope you liked it!
Let me know what you think, do you have any other topics you are interested in learning about? Let us know!
Have a great week and happy cake decorating!
Christie


.jpeg)


Comments
Post a Comment