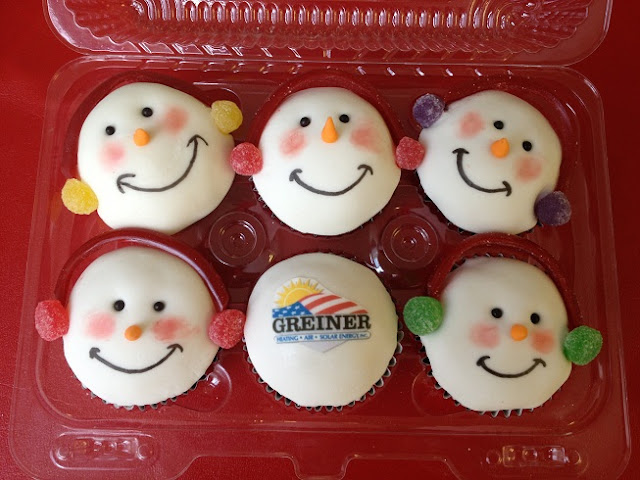
Snowman Cupcakes
Tis the season to make snowman cupcakes! Cupcake gift boxes are a perfect and fun gift for anyone on your Christmas list. Get your cupcake pans ready, because here is the step by step how to guide:
How to make Snowman Cupcakes
 1. Make Fondant - At least 1 night before make your Marshmallow Fondant (See recipe below). The marshmallow fondant recipe yields fondant for approximately 2 dozen cupcakes.
2. Bake Cupcakes - I prefer cupcakes to be soft and fluffy in texture. To increase these characteristics I replace oil with unsalted softened butter, decrease water by about 1/8 cup and add 1/4 cup of sour cream or buttermilk . I also like to use Betty Crocker cake mix as it results in a less dense batter than Pillsbury (of course I prefer Pillsbury for cake batter).
 3. Make Buttercream - this is the best buttercream recipe, I highly recomend it: http://everybakingmoment.com/recipes/janis-buttercream. When cupcakes have cooled, give each cupcake a light coat of buttercream.
 4. Gather the Following Materials - Dust brush, paint brush, gum drop candy, 4mm black sugar pearls, pink shimmer dust, water, orange fondant (color a small amount orange), Sour Patch candy sticks (or Twizzlers), large round cookie cutter, sharp point stick (like a knitting needle), fondant roller, and edible ink black pen. A lot of these items can be found at Every Baking Moment in Dixon or at your neighborhood Michael's Arts and Crafts store.
5. Make the Face - Roll out your fondant with your fondant roller, and using a large round cookie cutter the same size as the cupcake cut out your face. Poke eyes with the knitting needle and push the black pearls (somewhat) into the hole. Shape the nose with your orange fondant into a small cone and paint the base of the cone with water to enable sticking to face. Paint cheeks with pink dust and brush, and draw smile with black edible ink pen.

 6. Make Earmuffs - Use the back of your paintbrush to poke sides of the face at an angle and insert candy sticks (see picture above). Cut gum drops in half, and with matching colors and like sides, paint flat side with water and place just under headband.
7. Add Edible Image (optional) - To add an edible image to fondant take your photo or print out to be scanned at Every Baking Moment in Dixon) cut it out of the sugar sheet, gently peel it off and place it on an area that you have smeared with shortening.
Happy Holiday Baking!!
Christie
******************************************************************************

Five Step Marshmallow Fondant
Happy Holiday Baking!!
Christie
******************************************************************************

Five Step Marshmallow Fondant
1 10 oz bag of mini marshmallows
1 tbsp of water
1 bag of powdered sugar
Color (optional)
1. Prepare a large glass or metal bowl with half a bag of powdered sugar and put it in a cleared sink (this works very well for me with the kneading process - my bowl has a sticky bottom to keep the bowl from slipping - If you don't have this put a sticky/plastic fabric between bowl and sink).
2. Put marshmallows and water in a glass bowl. Microwave on high for 30 seconds, remove, stir with a spatula, heat again for 15 seconds, stir. Repeat in 15 second increments until marshmallow have dissolved. Do not overheat as it can ruin the marshmallow consistency.
3. Add your color to melted marshmallows and stir. You can also add whitening white (a great Wilton product) to get it a very even white. When thoroughly mixed, pour your gewy mixture right into the center of the bowl with the powdered sugar in the sink.
4. With your spatula GENTLY and SLOWLY fold the sugar into the marshmallows. As the marshmallow thickens start kneading. Add powdered sugar when necessary. After 10-15 minutes you should have a nice ball of Marshmallow fondant.
5. Coat your fondant with shortening and wrap your ball tightly in plastic wrap and put in a plastic bag. REFRIGERATE your fondant overnight. If you do not refrigerate your fondant it will not hold it's shape when you try making things like bows and it will not be the right texture. Bring out your fondant a few hours before you start decorating so that it is nice and soft and pliable when you are ready to use it.


Festive
ReplyDeleteNice. Delightful Red Velvet Cakes in mohali. Order beautiful cakes online-Belly Amy's for delicious, custom designs that impress every fan!
ReplyDelete